


The Challenge of Arduino and MP3
The Mysterious Circuit
Arduino and MP3 may not seem like a natural combination, but with a specialized circuit, they can work together to create music. This circuit acts as the main processor, while Arduino takes on the role of a humble supervisor. However, this circuit comes with its own set of challenges and mysteries.
The Lack of Documentation
One of the main obstacles when working with this circuit is the lack of accessible and comprehensive documentation. Rather than having a neatly packaged set of instructions, the documentation is a chaotic collection of copies and descriptions scattered across various sources. This makes it difficult for users to fully understand and utilize the circuit’s capabilities.
The Unruly Family of Circuits
Furthermore, this circuit belongs to a larger family of related circuits, each with their own quirks and issues. These circuits can differ in latency and internal noise, leading to discrepancies in performance. Some variations even have stereo channels that are shorted or produce silent outputs for certain commands. This lack of consistency adds another layer of complexity to working with Arduino and MP3.
Navigating the Challenges
Despite these challenges, it is important for enthusiasts to learn how to navigate and overcome them. Adapting to situations where clear documentation is lacking and dealing with circuit variations is becoming the norm in the field of electronics. By exploring and experimenting with these circuits, we can gain a deeper understanding of their capabilities and limitations.
The Learning Journey
While working with Arduino and MP3 may not be straightforward, it offers an exciting learning journey. By combining the power of Arduino with the specialized circuit, users can create unique musical experiences. Understanding the nuances of the circuit and finding creative solutions to the challenges it presents will help enthusiasts grow their skills in the field of electronics.
Naley, take doceni fakt i to malestwo kosztuje grosze
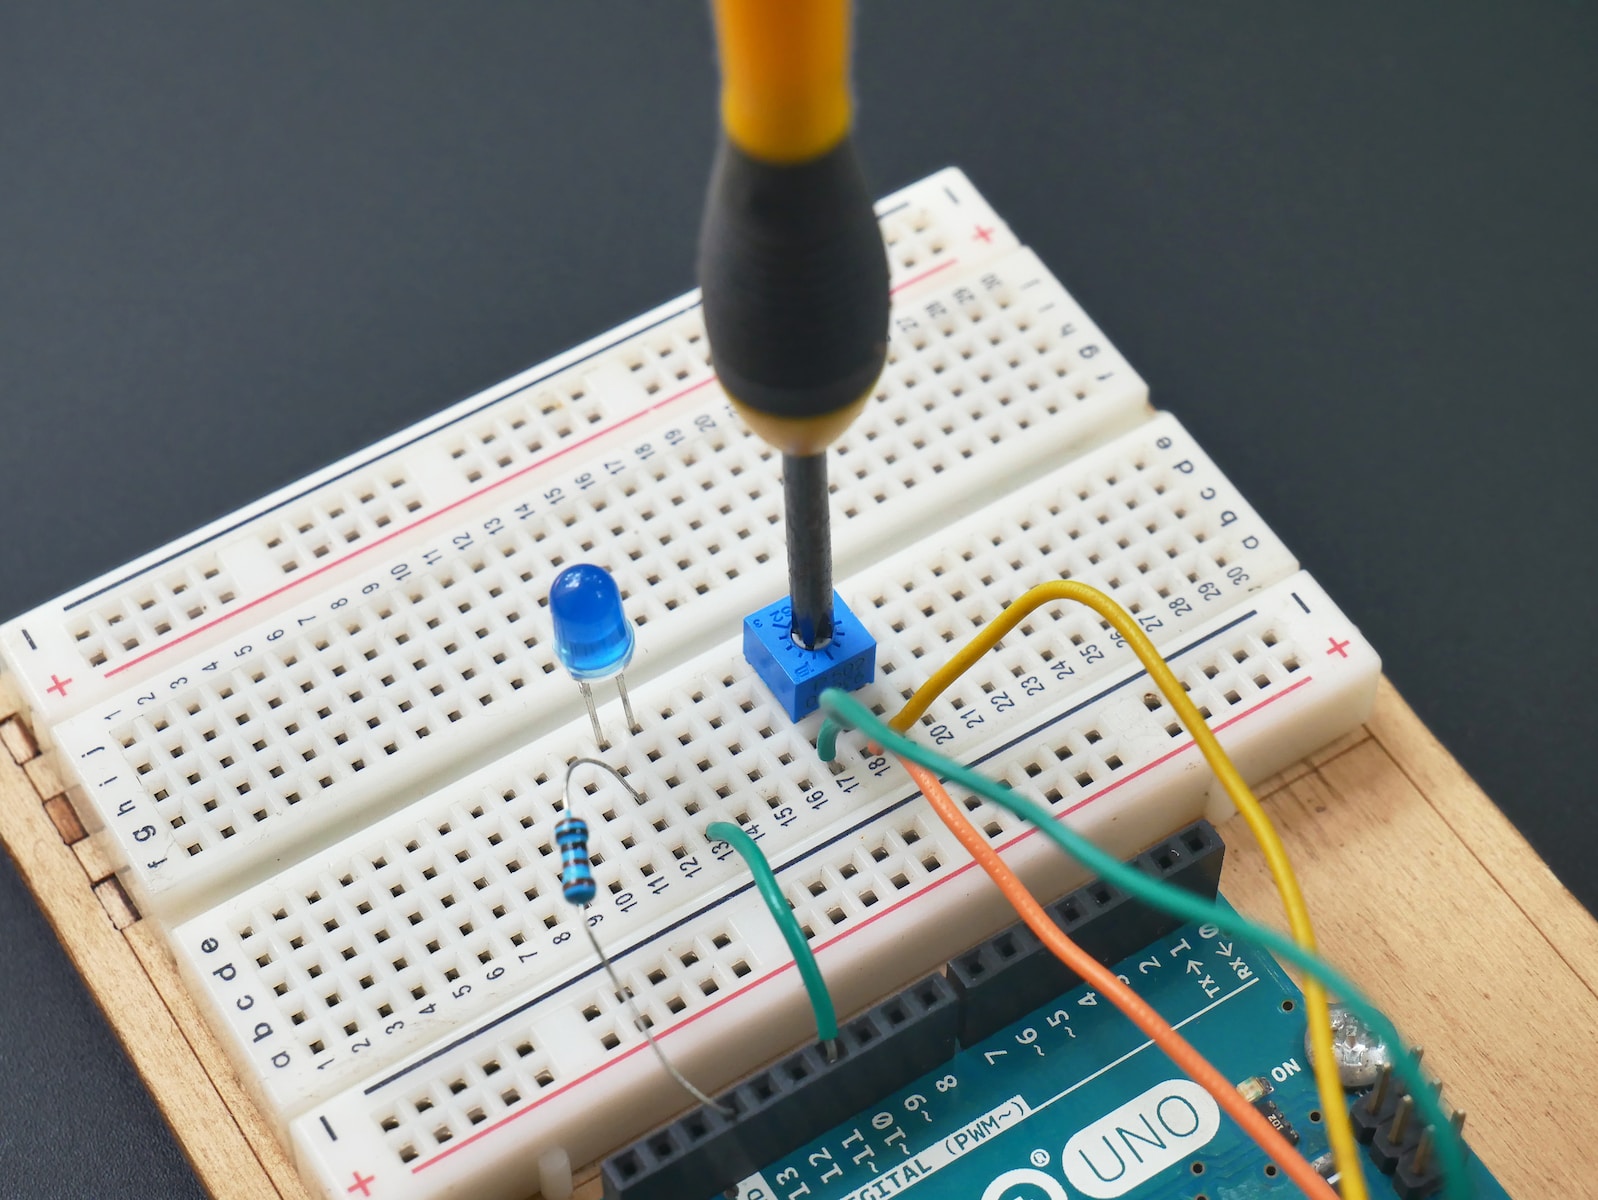
The DFPLayer Mini is a small device that plays audio files of decent quality at a very affordable price. It is a tiny chip that looks like a sixteen-pin IC, with slightly wider pin spacing. It operates on a voltage range of 3.3 to 5 volts, although some may not function optimally at lower voltages. The chip contains two decoders for compressed audio signals, along with peripherals and a mono audio amplifier capable of delivering 3W of power at 5V. It also features a microSD card slot for data storage. Its main purpose is to generate audio messages in various hardware applications. It can work as a peripheral for a microprocessor system or as a standalone device, selecting one of several pre-recorded messages. Although this article focuses on its compatibility with Arduino, the chip can be used with any system that has a serial port, and the circuit is fairly simple to connect.
Ju od naszych potrzeb zaley czy, zechcemy, korzysta, z, pokadowego wzmacniacza, czy, liniowego, wyjcia, stereo
The sound output of the DFPLayer Mini depends on our preferences and requirements. We can choose to use the onboard mono amplifier or the stereo line output. The quality of the sound also depends on the chip itself, and in this case, there is a third element to consider – the inconsistency in the supply of cheap electronics from a certain country in Asia. My unit sounds good, but there is a noticeable level of distortion that disappears when the playback is paused. The best way to evaluate the sound quality is to listen to a test signal. The test track features a dynamic range of about 40 dB, which is typical for inexpensive portable media players. Therefore, it is not designed for high-fidelity audio applications, but rather for simple uses.
Jak to w ogle brzmi
The sound produced by the DFPLayer Mini is satisfactory for its intended purposes. It is capable of playing audio files with a decent level of clarity and volume. However, as mentioned earlier, it may not meet the expectations of audiophiles or those seeking high-quality audio reproduction. Nevertheless, for projects and applications where cost and simplicity are the main considerations, the DFPLayer Mini is a great option.
Overall, the DFPLayer Mini offers a cost-effective solution for generating audio messages in various hardware applications. It is a small and affordable device with decent audio quality and simple connectivity options. While it may not satisfy the audiophile’s highest standards, it serves its purpose well and provides a budget-friendly choice for hobbyists and DIY enthusiasts. Whether used with Arduino or other systems, the DFPLayer Mini proves to be a versatile and practical component for audio playback.
The Limitations of Arduino Audio Playback
When it comes to enhancing audio playback on Arduino, there are a few significant limitations to be aware of. The first constraint is the lack of compatibility with the File System. We can only access files through indexes and not in alphabetical order, making it difficult to navigate through a library of files. Additionally, the Arduino lacks the ability to scroll through files, only allowing for skipping to the next or previous file.
Addressing the Limitations
To overcome these limitations and improve audio playback on Arduino, we will utilize a set of buttons as control inputs. This setup will involve connecting four wires, including a power supply, and using resistors with a value of 1 kilohm on the serial port lines. Before proceeding further, it is essential to record examples on an SD card that will serve as the audio files. These examples can be compressed using the Lame encoder with the Extreme profile, providing high-quality audio.
Communication with the Arduino
The Arduino communicates using a low-level language consisting of commands that rely on a few bytes. However, this method can be cumbersome. Fortunately, there is a library available that formulates more user-friendly commands, making it easier to interact with the Arduino. Additionally, we will utilize another library to create an additional serial port for communication with the Arduino.
Why Create Something New?
One might wonder why we need to create something new when the Arduino already has a built-in serial port. The reason for this is that the built-in port is primarily used for communication with a computer during programming. By creating an additional serial port, we ensure that the Arduino can be used for audio playback independently without interrupting communication with the computer.
Preparing for Expansion
While the minimalistic version may not have all the desired features, it serves as a foundation for future expansion. With this in mind, a program has been created to allow for easy modifications and additions. It is worth noting that when programming the Arduino, at least one of the player’s lines would need to be disconnected to avoid interference with communication to the computer. This can be easily managed during the development process.
Although the Arduino has some limitations when it comes to audio playback, with the right setup and libraries, these limitations can be overcome. By using control inputs, additional serial ports, and carefully designing the program, we can enhance the audio playback experience on Arduino.
Catching up with the Latest: Polish Names for our Objects
Introducing the Serial Port
When it comes to naming our objects, we like to give them friendly Polish names. In this case, we have created a programmatic serial port called RX and TX. For testing purposes, I am using my favorite test board, which comes with a built-in keyboard. We will be selecting files to play, adjusting the volume, and pausing playback. It should be noted that on the educational board, the ports are connected through an inverter, so positive logic applies, meaning that when a button is pressed, it is in a high state. If buttons directly connected to Arduino’s ground are used, the conditions in the module for checking the keyboard state need to be swapped. Now, let’s initialize the software serial port. The default baud rate for the player’s side is set to 9600 baud. Here, we declare the keyboard and initialize the player.
Adjusting Volume and Enabling Continuous Playback
Next, we set the default volume. You can enter any number from 0 to 30. The next line should be included if we want to enable random playback. However, if we want continuous playback, we don’t need this line. And that’s all for the introduction. Now, let’s move on to keyboard handling.
Recognizing the Buttons
We have five buttons to handle. The pair of left and right buttons allows us to navigate to the previous and next file, respectively. In random playback mode, both buttons essentially serve the same purpose because the player does not remember the played files. The pair of higher and lower buttons allows us to adjust the volume. The middle button is used to pause playback, which can be resumed by pressing any of the side buttons. Each group of buttons follows a similar pattern. First, we identify the button and then we use a command created by the library. Finally, we wait for the button to be released. In the last case, the line is unnecessary, although its absence is inelegant because it continuously sends messages.
A Simple yet Useful Media Player
Operating a media player should be an intuitive and straightforward process. However, some players may have complex instructions that can be confusing for users. In this article, we will discuss the significance of providing clear instructions for operating a media player and how simplicity can enhance usability.
Elements for Analysis
To analyze the functionality of a media player, there are several essential elements that should be considered. These include the MP3 player itself and the terminal used for receiving player statuses. Additionally, a bit variable switch can be introduced to enable the stop and resume functionality. Let us delve into the shortcomings of a poorly functioning media player and explore possible remedies.
The Issue of Latency
One common issue that arises from unreliable media player performance is latency, specifically in the delays experienced during the playback of files. Although the playback might eventually correct itself, the communication between the player and the user is imprecise. To mitigate this, strategic pauses can be integrated into the player’s system. These pauses, set at an experimental interval of 300 ms, can help establish coherence during data display on the terminal. The duration of these pauses can be adjusted depending on the system requirements.
Addressing Communication Challenges
To address potential communication challenges, lines of messages can be implemented into the media player. This is particularly useful during the initial interaction with the player, where a validation message ensures that the player is active. If the player fails to respond, an appropriate prompt can be displayed and the operation can be halted until further clarification. Using additional library commands, important information regarding the number of files found on the device can also be obtained.
Streamlining Operations
Default values can be assigned to streamline the operation of the media player. However, it is essential to intersperse actions with pauses, as continuous data acquisition without any breaks can lead to data overload. Commands such as skipping and adjusting volume only differ in terms of the generated messages on the terminal.
Providing clear instructions and ensuring simplicity is crucial when operating a media player. By addressing communication challenges, minimizing latency, and implementing strategic pauses, users can have a seamless and enjoyable experience with their media player.
The Importance of Separate Subprograms
When it comes to an audio player, having separate subprograms for different functions is crucial. This allows us to read and determine which file will be played, as well as how many files there are in total. Additionally, the last line of code sets the pause switch, allowing the player to exit the paused state. In the case of volume control, we also receive information about the current volume level. In this scenario, pausing is unnecessary.
Differentiating Start and Stop Functions
The handling of the Start/Stop button is slightly different, depending on whether it is an odd or even press. When pressed on an odd occurrence, it activates the playback, while on an even occurrence, it stops. Consequently, a binary variable called “odtwarzanie” is created to refer to the playback state.
Utilizing the Player Status Control Module
To enhance the functionality of the audio player, I decided to incorporate a player status control module, which can be found in the factory example. However, I made some modifications and translated it into Polish. This module can provide brief explanations of certain situations. The first two messages signify issues related to the files. By intentionally creating some damage, there is a chance to identify which file is affected. The next three messages appear when ejecting the card, and another message is displayed after the playback of a file is completed. In this case, a message similar to when skipping to the next track is sent. Finally, there are various messages related to player problems. The last message represents the activation of the so-called advertising mode, where the main collection of files is replaced by a higher priority set. This is often used in stores, where the music is cyclically replaced with informational or advertising clips. After playing this block, the device returns to playing the interrupted list. Note that these are not all the possible messages and functions of the player, but many important aspects have been covered.
Arduino and MP3 may not be a conventional combination, but with the right circuit and perseverance, it is possible to create music using these tools. Overcoming the lack of documentation and navigating the variations within the circuit family may be challenging, but it is an opportunity for enthusiasts to expand their knowledge and skills. Embracing the learning journey and experimenting with these circuits will lead to exciting and innovative creations in the world of electronics.


