


Arduino CLI: Getting Started
When you first install the Arduino CLI, you wont have any support for any library or cores or platforms. So the first thing that we can do we can launch the command just the naked one. Arduino CLI and see that we get an help screen which tells us with what we can do so, for instance, we can invoke an obsession for any command or any sub command, lets just try and clean up and were on arduino CLI. That h is gon na give us the same results or the same help screen for the commands that we can run. We are interested in creating a basic sketch and compiling it and uploading to the to the board that we have a touch. Lets first see what we can do with the board command arduino CLI board. We can run some commands, we can list the boards which are attached to your to our computer and we can also see the details about a board. Lets try and run the first one. So arduino CLI, thats, arduino, CLI or list its going to run through our USB connected devices and its gon na show us the boards that we have connected. You can clearly see that we have an arduino uno and then arduino nano 33 iot. These boards rely on two different cores: one is an AVR, so it relies on arduino AVR and the other one relies on the sandy core from microchip and the fqdn tells us the fully qualified board name, which is in this case arduino AVR uno and in the Case of the nano 33, its Arduino Sandy, nano 33 IOT.
This command is very helpful because its gon na tell us a bunch of things about the border we have attached. So lets first see what we can do. We said that we have no course our Arduino CLI core list. We have no course installed, but we need to install the two cores for the two boards that we have connected. Our do. You know CLI core install arduino AVR for the arduino no and its going to download all the course. This is the same operation that happens in the in the traditional ID and its installing all the tools that we need so to upload to compile and everything else lets try and run arduino CLI core list. We now have arduino AVR person. Eight point two one point eight point: two lets just all the other one: if we dont remember, we can simply issue the command board list and we now know that we need to install arduino sandy, so arduino CLI core install arduino sandy. This is going to go through the same process, its going to download the supporting files and cores and specs for every board that we created and, of course, as we can install cores that are produced by us at arduino. We can also install third party cores. We can see in the future out to do this, and this one is done so our next command arduino CLI core list, its going to show us that we have both cores installed.
Lets move forward. The first thing that we want to do. We want to create a new sketch if we dont remember, we can simply go arduino CLI and its gon na show us a bunch of command. What we want to do. We want to create a sketch, so lets try and and go this way. Arduino CLI sketch its gon na tell us what we can do, so we can clearly create a new sketch, so new, well create a new sketch and you will accept so lets. See lets see the options that we have for new Arduinos CLI sketch new. That page – and we have flags that we can give – we can give it a name, for instance, so lets just try and create a blink script. Arduino CLI, sketch new blink me and you guys, created a new sketch in the folder blink me in our home folder. So what can we do with this? Well lets, first of all enter the path, and we have one Ino file so lets see. Whats inside the sketch has been created, its an empty sketch, which contains a void setup and avoid loops. So this means that we can open our favorite text editor and just go and edit the file for convenience Im just gon na. Do it in the terminal so Im going to add it using nano blink me and lets see what we can do here. We can set its a blink example, so lets just set the pin node of the LED built in pin to output, so we can control it and we can digital write LED built in high to turn it on.
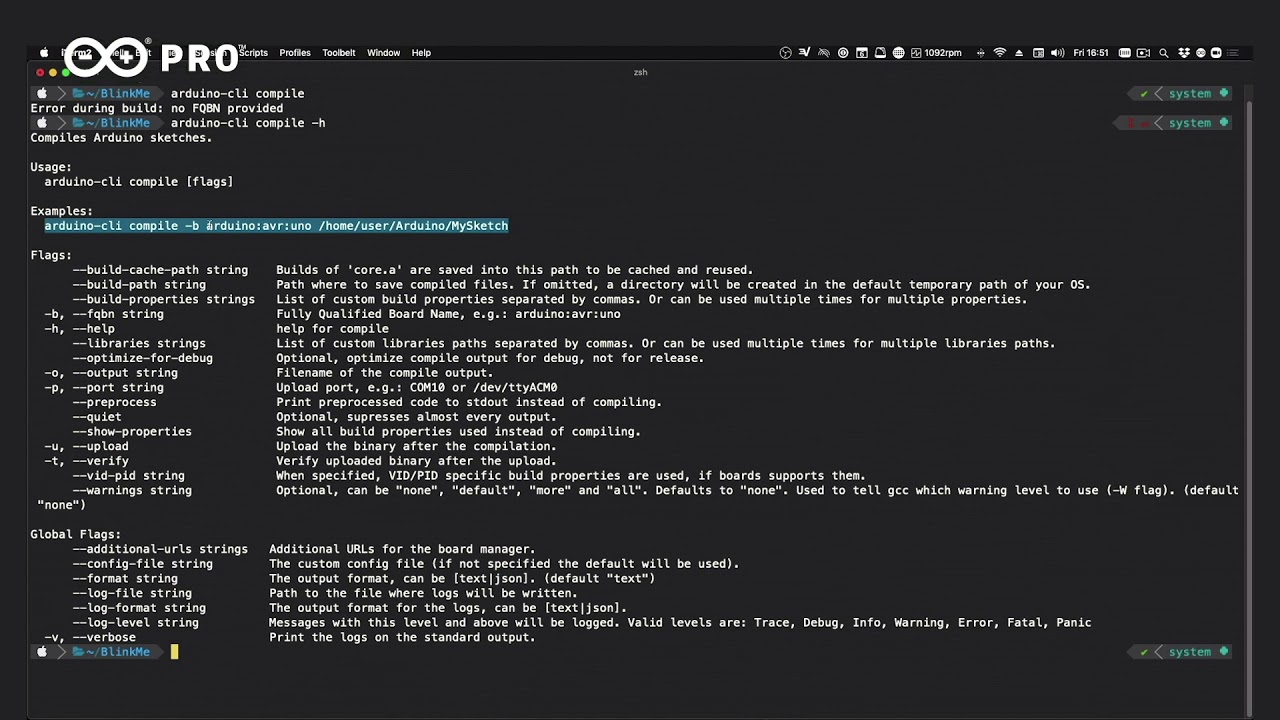
We wait off a second digitalwrite LED built in low, oh theres, a typo here and delay 500. So this is our sketch. We can exit the sketch and save it. So if we show the content of the file, we see that this is complete and it works. Well, as can we do with this sketch? Well, we want to just compile the sketch to see if it works, if it runs so lets see what we have as available commands arduino CLI, and we can clearly see that we have compiled. So how do you know CLI compile and its gon na tell us that it doesnt know which board to compile for lets. Look at our options. Cli compile that H. It expects some flags and there is an example which is compatible with the with one of the boards that we have connected. So lets just say that we compile B is an abbreviation for a fully qualified board name and were gon na use this one for convenience. So we can run Arduino CLI, compile B, Arduino AVR uno. So if we are using, for instance, a nano, we would write, Arduino AVR nano and it expects a path to the sketch that we want to compile. But we are in the same sketch. Sorry. In the same folder as a sketch, we want to compile so lets just try and do this Arduino CLI compile B, Arduino, AVR uno and it compiles. This is a very simple sketch, so it takes pretty much no time to compile it, but what we can do we can see what happens in the background by simply adding a flag to the command and this flag is V which stands for verbose, and this is Gon na show what some people are interested in to see if theres any errors, if theres any path, discrepancies and so on, so the sketch is compiled.
This means that if we list the files, we are gon na see an L F file, which is for debugging and the final dot hax file, and you can see that, depending on the board that we want to install. There are two options: if you upload, using an ISP programmer, for instance, or you know, an SDK 500 or something its gon na, create one without the bootloader. But if we, if we need to preserve the bootloader its you know, it has created one with the bootloader and this is the source file. So we now want to upload the file that we have created so arduino CLI lets, try upload its expecting a parameter from us, so arduino CLI upload requires a flag, and you know it can have some flags that are related to the board. We want to install too, but one that we really care about. Right now is the be flag, so the port flag, arduino CLI board list – and we want to use this serial port – were gon na copy and were gon na paste it in line so arduino CLI upload, be Arduino, AVR uno be, and we paste this one and It should be uploaded lets just run it with a dash B and, yes, it is working correctly. So our board, as a blinking, LED Arduino CLI board attached H for help. We can specify a few parameters, such as the port and fully qualified born um name, but we can just more quickly specify the serial port the board is attached to and the CLI is going to automatically recognize the board and and create a configuration file.
There is everything it needs to quickly compile and upload. So lets see how to speed up this process. Arduino CLI board list will copy the serial port. Our board is attached to and well run this simple command. Arduino CLI board attach serial colon, slash, slash and our board name and Im going to pass in the verbose flag. So we can see whats happening, lets clear the window and launch the command its doing a few things, its recognizing the board and everything that it needs and its done. So if now we go list whats in our folder, we can see that we have a new file called sketch Jason whats inside the sketch, though Jason whats lets look at it theres a new set of settings that basically tells us that the CPU, so the the Board that we are connected to attached to as an F qbn of Arduino some D, nano underscore 33 underscore IOT. The name of the board is Arduino, Nano, 33 IOT and thats exactly what we have a touch to our serial port and the port is connected to. Is our dev see you USB more than one four four five blah blah blah so now essentially remember when we earlier needed to run a series of commands right, we needed to do Arduino, CLI, compile, B, Arduino or Sandy nano 33 IOT in this case, to compile The code right and right now we have an attached configuration. So basically, all of this can be replaced by Arduino CLI, compile lets pass verbose through and you see the the sketch dot JSON file tells the Arduino CLI, which target to compile for and lets look at.
Our files, as you can see from earlier, we have the compilation files related to the AVR uno, and we now have these two files, which are related to the Sandy nano 33 IOT. And if we want to upload a sketch, we can simply run this command. So Arduino CLI upload V and in a moment we should be able to see whats happening behind the scenes as it uploads to our Nano 33 IOT done. So our nano thirty three IOT, as you can see in the camera view, is now blinking of a second on half a second off. We can even do it faster. So you know when, in the traditional Java ID we just push the upload button, we can simply issue this command, arduino, CLI, compile upload and its compiling and its uploading and its all done just as quickly as we saw it. I hope its enough as an introduction to the Arduino CLI. We really look forward to giving you more content and pushing this lets. Call it progressive tutorial forward with other examples going through other supported boards, installing extra cores, as well as debugging and building applications for IOT connected objects.


