


Arduino UNO
The Arduino UNO is a popular microcontroller board based on the ATmega328P microcontroller. It is widely used in a variety of projects, from robotics to home automation. It is also the board used in this tutorial for running the OLED animations.
U8g2 Library
The u8g2 library is a monochrome graphics library for embedded systems. It supports a wide range of displays, including OLEDs and LCDs. It is used in this tutorial to generate the code for the OLED animations.
Adafruit GFX Library
The Adafruit GFX library is a graphics library for embedded systems. It is used in this tutorial to generate the code for the OLED animations. It supports a wide range of displays, including OLEDs and LCDs.
SSD1306 and SSD1309
The SSD1306 and SSD1309 are two popular OLED display controllers. They are used in this tutorial to generate the code for the OLED animations. They are both monochrome displays, meaning they can only display one color at a time.
Walkway Animator
Walkway Animator is a free online tool for creating OLED animations. It is used in this tutorial to generate the code for the OLED animations. It supports a wide range of displays, including the SSD1306 and SSD1309. It is easy to use and requires no programming knowledge.
Creating the Animation
To create the animation, the first step is to select the desired icon from the Walkway Animator library. Then, the size of the icon can be adjusted to fit the display. Finally, the code can be generated by clicking the Get the Code button.
Running the Animation on the Arduino
To run the animation on the Arduino, the first step is to upload the code to the Arduino board. This can be done using the Arduino IDE. The next step is to connect the OLED display to the Arduino board. This is done by connecting the displays data pins to the Arduinos digital pins. Finally, the animation can be run by powering up the Arduino board.
So if I change this delay to be 10 milliseconds instead of one second, the animation will be much faster.
Arduino OLED Animations
Arduino OLED Animations are a great way to bring life to your projects. This tutorial will guide you through the basics of setting up an Arduino UNO, u8g2, Adafruit GFX, and SSD1306/SSD1309 libraries to create an animation on an OLED display.
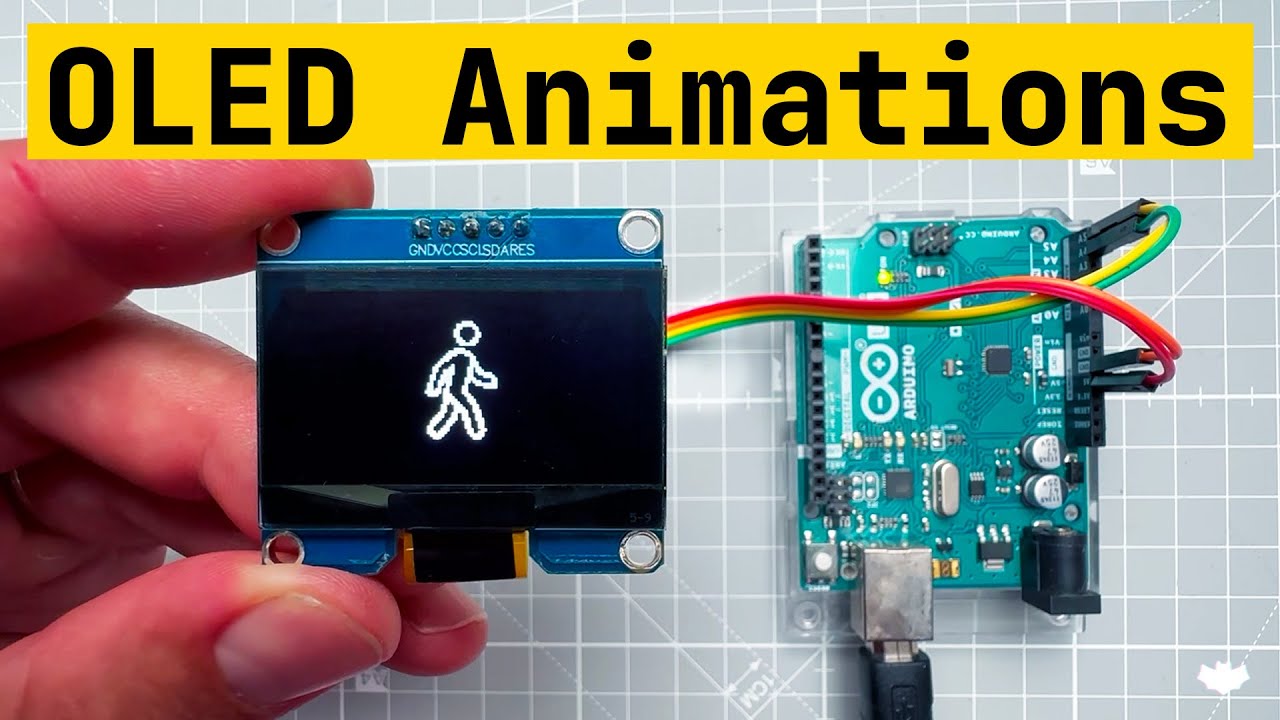
Connecting the OLED Display
To begin, connect the OLED display to the Arduino UNO. The ground should be connected to ground, the VCC should be connected to 5 volts, the SCL (serial clock) should be connected to pin A5, and the SDA (serial data) should be connected to pin A4.
Adding Libraries
Next, open the Arduino IDE and copy the code into the clipboard. The code uses two libraries: Adafruit GFX and Adafruit SSD 1306. To add these libraries, click the Library Manager icon and type in Adafruit GFX. Click the library and then click the plus button one more time and type in Adafruit SSD 1306 and click the library.
Running the Simulation
Once the libraries are added, click the Start Simulation button and after a few seconds, the simulation will be running. However, nothing will be seen on the display. To fix this, open the help page for the OLED display and check that the address is set to 3C. If it is set to 3D, change it to 3C and restart the simulation.
Speeding Up the Animation
The animation may be running slowly due to a delay inside the loop. To speed up the animation, change the delay to 10 milliseconds instead of one second. This should make the animation much faster.
Arduino Uno and OLED Display
The Arduino Uno is a popular microcontroller board based on the ATmega328P microcontroller. It is widely used in projects that require a low-cost and easy-to-use platform for creating interactive electronic projects. The Arduino Uno can be used to create animations with OLED displays. OLED displays are thin, lightweight, and energy-efficient displays that use organic light-emitting diodes (OLEDs) to create images. They are often used in projects that require a small display with a high resolution.
U8g2 and Adafruit GFX Libraries
In order to create animations with an OLED display, the Arduino Uno must be programmed with the u8g2 and Adafruit GFX libraries. The u8g2 library is a graphics library specifically designed for monochrome displays. It is capable of displaying text, images, and graphics on a variety of monochrome displays, including OLED displays. The Adafruit GFX library is a graphics library that provides a common set of graphics primitives for drawing on a variety of displays. It is used to draw shapes, lines, and text on the OLED display.
SSD1306 and SSD1309
The SSD1306 and SSD1309 are two popular OLED display controllers. The SSD1306 is a 128×64 pixel resolution display controller that is commonly used in small OLED displays. The SSD1309 is a 128×64 pixel resolution display controller that is commonly used in larger OLED displays. Both controllers have the same pinout and can be used with the same libraries.
Creating Animations with Arduino Uno and OLED Display
Creating animations with an Arduino Uno and OLED display is relatively straightforward. First, the Arduino Uno must be connected to the OLED display with the appropriate wiring. Then, the u8g2 and Adafruit GFX libraries must be installed on the Arduino Uno. Finally, the code for the animation must be written and uploaded to the Arduino Uno. The code for the animation can be written using the u8g2 and Adafruit GFX libraries. Once the code is uploaded to the Arduino Uno, the animation will be displayed on the OLED display.
So I have to go to the settings and here I can select the loop option, and then I can see all the frames. So now I can click the generate button and it will generate the CPP file.
Arduino UNO
The Arduino UNO is a popular microcontroller board that is used for a variety of projects. It is based on the ATmega328P microcontroller and is programmed using the Arduino IDE. It is capable of running a variety of programs, including those that involve OLED animations.
U8g2
U8g2 is a library for the Arduino UNO that enables users to easily create and display OLED animations. It is based on the Adafruit GFX library and supports a variety of displays, including the SSD1306 and SSD1309. It is easy to use and provides a wide range of features, including support for multiple fonts and graphics.
Adafruit GFX
Adafruit GFX is a library for the Arduino UNO that provides a range of graphics functions. It is used in conjunction with the u8g2 library to create and display OLED animations. It supports a variety of displays, including the SSD1306 and SSD1309.
SSD1306 and SSD1309
The SSD1306 and SSD1309 are two popular OLED displays that are used in conjunction with the Arduino UNO. They are both capable of displaying animations, and they are supported by the u8g2 and Adafruit GFX libraries.
Creating OLED Animations
Creating OLED animations for the Arduino UNO is a relatively simple process. First, the user must install the u8g2 and Adafruit GFX libraries. Once these are installed, the user can select the board (in this case, the Arduino Uno) and click the upload button. This will upload the code to the board, and the animation will be displayed on the OLED display.
Alternatively, the user can use a tool such as Image to CPP to convert a GIF file into C-style arrays. This can then be used to create an animation that is displayed on the OLED display.
Overall, creating OLED animations for the Arduino UNO is a relatively simple process. With the right tools and libraries, users can easily create and display animations on the OLED display.
And the second thing is to select the correct color depth. So I will select one bit per pixel, which is the same as black and white.
Understanding OLED Animations
OLED Animations are a popular form of visual media used to convey information or create a desired effect. The technology behind OLED Animations is based on the use of organic light-emitting diodes (OLEDs). OLEDs are a type of semiconductor that emits light when an electrical current is applied to it. OLED Animations can be used to create a wide range of visual effects, from simple static images to complex animations.
Creating OLED Animations with Arduino
Creating OLED Animations with Arduino is a relatively simple process. The most important components for creating OLED Animations are an Arduino Uno, a u8g2 library, Adafruit GFX, and an SSD1306 or SSD1309 display. The first step is to create the individual frames for the animation. This can be done by using an online tool such as Photoshop or Follow P. Once the individual frames have been created, they must be exported as individual images. These images can then be converted into C style arrays using an online tool such as Image2CPP. The next step is to invert the images and select the correct color depth. Finally, the code must be written to create the animation.
Writing the Code for OLED Animations
Writing the code for OLED Animations is the most complex part of the process. The code must be written to control the display, set the frame rate, and control the animation. The code must also be written to ensure that the animation runs smoothly and without any glitches. The code must also be written to ensure that the animation is displayed correctly on the display.
Testing OLED Animations
Once the code has been written, it is important to test the animation to ensure that it is working correctly. This can be done by uploading the code to the Arduino Uno and running the animation. If any errors or glitches are encountered, the code must be adjusted accordingly. Once the animation is working correctly, it can be used in a variety of applications.
We can also generate the code for the animation. So I will just copy this part and paste it in our loop and now when I restart the simulation, you can see that the animation is playing over the display.
Using Arduino UNO to Create OLED Animations
Arduino UNO is a popular microcontroller board that can be used to create a variety of projects, including OLED animations. OLED animations are a great way to add a dynamic element to your project, and with the help of the u8g2 library, Adafruit GFX, and SSD1306 and SSD1309, you can create stunning animations with ease.
Getting Started with Arduino UNO and OLED Animations
To get started with Arduino UNO and OLED animations, you’ll need to make sure that the Swap checkbox is checked. This is necessary because the u8g2 library will be used to draw the animations. Once you have checked the Swap checkbox, you can generate the code and copy the output.
Using the u8g2 Library to Create Animations
The u8g2 library is a powerful tool for creating animations with Arduino UNO. To use the library, you’ll need to start with an existing project, such as the one from the video titled “Image to OLED in 60 Seconds”. Once you have opened the project, you can delete the full-screen image definition and paste the content from the Image to CPP website. This will give you 28 different frames that you can use to create your animation.
Generating Code for the Animation
Once you have selected the frames for your animation, you can generate the code for the animation. This code can then be pasted into the loop of your project. When you restart the simulation, you’ll be able to see the animation playing over the display.
Arduino OLED Animations
Arduino OLED Animations are a great way to add visual interest to projects. With the help of Arduino UNO, u8g2, Adafruit GFX, SSD1306, and SSD1309, users can create impressive animations for their projects. This tutorial will provide a step-by-step guide on how to create Arduino OLED Animations.
Creating the Animation
The first step in creating Arduino OLED Animations is to create an array that holds all the individual frames. This array can then be used to draw the images. However, the order of the individual items may not be correct. To fix this, the array must be sorted based on the number.
Once the array has been sorted, it can be used to draw the image. To do this, a new variable called counter must be created. This variable should be set to 0 and then increased by 1 after each frame is drawn. Since there are 28 frames, the counter should be set to modulo 28 to ensure that it is always between 0 and 27.
Centering the Image
The image can be centered on the display by increasing the x and y values to 139 and 7 respectively. After adjusting these values, the animation should be playing in the middle of the screen.
Testing on a Real Arduino
Once the animation has been created, it can be tested on a real Arduino. To do this, the user must ensure that the chip used is either SSD1306 or SSD1309. Additionally, some modules may support two different I2C addresses. If this is the case, the user must switch between these addresses.
Arduino OLED Animations
Arduino OLED Animations are a great way to add visual flair to your projects. With the right hardware and software, you can create stunning animations that will bring your projects to life. This tutorial will provide an overview of the necessary components, as well as a step-by-step guide to creating your own Arduino OLED Animations.
Hardware Requirements
To create Arduino OLED Animations, you will need an Arduino UNO, a u8g2 library, an Adafruit GFX library, and a compatible OLED display. The most common OLED displays are the SSD1306 and SSD1309, but other models may be used as well.
Software Requirements
In addition to the hardware components, you will also need the Arduino IDE and the u8g2 library. The u8g2 library is available for free from the Arduino website, and it provides a comprehensive set of tools for creating and manipulating OLED displays.
Setting the Address
Before you can begin creating your animations, you will need to set the address of your OLED display. This is done by desoldering the resistor on the PCB and soldering it again on the right side. This will switch the address from 7 8 to 7A. This is because 3C and 3D are 7-bit addresses, while 7, 8, and 7A are 8-bit addresses. Once the address is set, you can call the u8g2 begin function to initialize the display.
Creating Animations
Once the hardware and software requirements are in place, you can begin creating your animations. The u8g2 library provides a wide range of functions for manipulating the display, including drawing shapes, lines, and text. You can also use the library to create complex animations with multiple frames.
Arduino OLED Animations
Creating animations with Arduino OLED displays is a great way to bring life to your projects. Animations can be used to give visual feedback to users, or to create a more engaging experience. In this tutorial, we will discuss the basics of creating animations with Arduino Uno, u8g2, Adafruit GFX, SSD1306, and SSD1309.
U8g2 Library
The u8g2 library is a popular library for creating animations with OLED displays. It is easy to use and provides a wide range of features. To get started, you will need to include the library in your sketch. This can be done by typing #include at the top of your sketch.
Begin Function
Once the library is included, you will need to call the begin function. This function sets up the display and prepares it for drawing. Most of the time, you don’t need to call this function as it is already predefined and hard-coded in the u8g2 library.
Memory Usage
When dealing with animations and a lot of images, it is important to consider memory usage. The Arduino Uno has 42 kilobytes of flash memory and 2 kilobytes of RAM memory. Since we don’t need to change the images during runtime, we can store them in the flash memory.
For every pixel, one bit is used. Since our image is 50 pixels wide, we use 6.25 bytes. However, since we can’t split bytes like this, we have to round this up to seven. This means that we are using seven bytes per line and seven times the height (50 pixels). This means that we are using 350 bytes for one image.
Since the Arduino Uno has 32 kilobytes of flash memory, we can store up to 90 images that are sized 50 by 50 pixels. However, we must remember to leave some memory for the program itself.
Arduino OLED Animations
Arduino OLED Animations are a great way to add visual flair to your projects. With the help of the Arduino UNO, u8g2, Adafruit GFX, SSD1306, and SSD1309, users can create custom animations with ease.
Arduino UNO
The Arduino UNO is the perfect platform for creating Arduino OLED Animations. With 255 kilobytes of Flash and 32 kilobytes of RAM, the Arduino UNO can store up to 700 images. However, the higher clock speed of the Arduino Uno R4 does not necessarily lead to faster animations.
U8g2
The u8g2 library is a great tool for creating Arduino OLED Animations. This library allows users to easily switch between individual frames and create custom animations. Additionally, the u8g2 library can be used with the Arduino Uno R3 boards.
Adafruit GFX
Adafruit GFX is a great library for creating Arduino OLED Animations. This library allows users to draw individual frames and then play the animation in real time. Additionally, Adafruit GFX can be used with the Arduino Uno R3 boards.
SSD1306 and SSD1309
The SSD1306 and SSD1309 are two popular display drivers for creating Arduino OLED Animations. These drivers allow users to easily switch between individual frames and create custom animations. Additionally, the SSD1306 and SSD1309 can be used with the Arduino Uno R3 boards.
Arduino OLED Animations are a great way to add visual flair to your projects. With the help of the Arduino UNO, u8g2, Adafruit GFX, SSD1306, and SSD1309, users can create custom animations with ease.
Arduino OLED Animations
Arduino UNO, u8g2, Adafruit GFX, SSD1306, and SSD1309 are all popular tools for creating animations on OLED screens. Animations can be used to create a more dynamic and engaging user experience, and they can also be used to convey information in a more visually appealing way.
Creating Animations
Creating animations for OLED screens can be a daunting task for beginners. Thankfully, there are a number of online tools that can help simplify the process. One such tool is the physical application, which is free and online. It allows users to create their own animations and view the previous frame as semi-transparent pixels. Additionally, users can view the animation playing in real-time on the right side of the screen. This makes it easy to make changes to the animation while still seeing the most up-to-date version.
Exporting Animations
Once the animation is complete, it can be exported as a GIF, PNG, or C-style array. This makes it easy to integrate the animation into an Arduino project. Additionally, it is possible to import animated GIF files into the physical application, which can save time and effort.
Creating OLED Animations with Arduino is a relatively simple process. By following the steps outlined above, anyone can create their own OLED Animations. With the right tools and code, OLED Animations can be used to create a wide range of visual effects.
Creating OLED animations with Arduino UNO is a great way to add a dynamic element to your project. With the help of the u8g2 library, Adafruit GFX, and SSD1306 and SSD1309, you can create stunning animations with ease.
Creating Arduino OLED Animations is a great way to add visual interest to projects. With the help of Arduino UNO, u8g2, Adafruit GFX, SSD1306, and SSD1309, users can create impressive animations for their projects. This tutorial provided a step-by-step guide on how to create Arduino OLED Animations.
Creating Arduino OLED Animations is a great way to add visual interest to your projects. With the right hardware and software, you can create stunning animations that will bring your projects to life. This tutorial has provided an overview of the necessary components, as well as a step-by-step guide to creating your own Arduino OLED Animations.
Creating animations for OLED screens can be a challenging task for beginners. However, with the right tools, the process can be made much simpler and more efficient. By using the physical application, users can create their own animations and export them as GIF, PNG, or C-style array files. This makes it easy to integrate the animation into an Arduino project.


